Hair extensions are an amazing way to instantly change your hairstyle, whether you’re looking to add length, volume, or a pop of color. However, store-bought extensions don’t always match your hair perfectly right out of the box. The good news is that you can easily customize hair extensions to suit your unique style and blend seamlessly with your natural hair. In this guide, we’ll walk you through the steps to customize your hair extensions so that they look and feel like they were made just for you.
Why Customize Your Hair Extensions?
Before diving into the how-to, let’s talk about why customizing your hair extensions is so important. Even the best-quality clip in hair extensions might not match your hair color, texture, or desired style perfectly. Customization allows you to:
- Achieve a Perfect Color Match: Hair colors vary widely, and even the slightest difference can make your extensions stand out in an unnatural way.
- Create a Seamless Blend: Customizing the cut and style ensures that your extensions blend flawlessly with your natural hair.
- Enhance Your Unique Style: Whether you want to add curls, waves, or layers, customizing lets you create a look that’s entirely your own.
Now, let’s explore how to customize your hair extensions to achieve your perfect look.
Step 1: Choose the Right Extensions
The first step in customizing hair extensions is selecting the right base. Here are a few things to consider:
- Material: Opt for 100% human hair extensions if you plan to color, cut, or heat style them. Human hair extensions are more versatile and durable compared to synthetic ones.
- Type: Decide whether you want clip-in, tape-in, or sew-in extensions. Clip-ins are the easiest to customize at home, while tape-ins and sew-ins might require a professional’s help.
- Length and Weight: Choose a length that suits your goals (e.g., adding length or just volume). Also, consider the weight of the extensions, as heavier extensions may require more customization for a natural look.
Step 2: Color Matching
One of the most common reasons for customizing hair extensions is to achieve a perfect color match. Here’s how to do it:
- Coloring at Home: If you’re comfortable with DIY projects, you can color your extensions at home. Use a professional-grade hair dye that matches your natural hair. Always test the dye on a small section first to ensure the color turns out as expected.
- Taking Them to a Professional: If you’re unsure about dyeing your extensions yourself, consider taking them to a salon. A professional colorist can expertly match the extensions to your hair color and ensure an even application.
- Adding Highlights or Lowlights: You can also customize your extensions by adding highlights or lowlights. This is a great way to create depth and dimension in your hair, especially if you want a multi-tonal look.
Step 3: Cutting and Trimming
Even if you’ve selected the right length, your hair extensions might still need some cutting or trimming to blend seamlessly with your natural hair. Here’s how to do it:
- Blending Layers: To make your extensions look natural, consider cutting them into layers that match the layers in your natural hair. This will help the extensions blend more smoothly and prevent them from looking bulky at the ends.
- Point Cutting: Use the point-cutting technique to trim the ends of the extensions. This technique involves cutting into the ends of the hair at an angle to create a more natural, feathered look. It’s particularly useful for avoiding that blunt, “wig-like” appearance.
- Consulting a Stylist: If you’re not confident in your cutting skills, it’s a good idea to take the extensions to a professional stylist. They can expertly cut and blend the extensions with your natural hair for a flawless finish.
Step 4: Styling the Extensions
Once you’ve got the color and cut just right, it’s time to style your extensions to match your desired look.
- Heat Styling: If you’re using human hair extensions, you can curl, straighten, or wave them just like your natural hair. Always use a heat protectant spray to avoid damaging the hair.
- Texturizing: If your natural hair has a specific texture (e.g., curly, wavy), you’ll want to match that texture in your extensions. You can do this by braiding the extensions while they’re damp to create waves, or using a curling iron for curls.
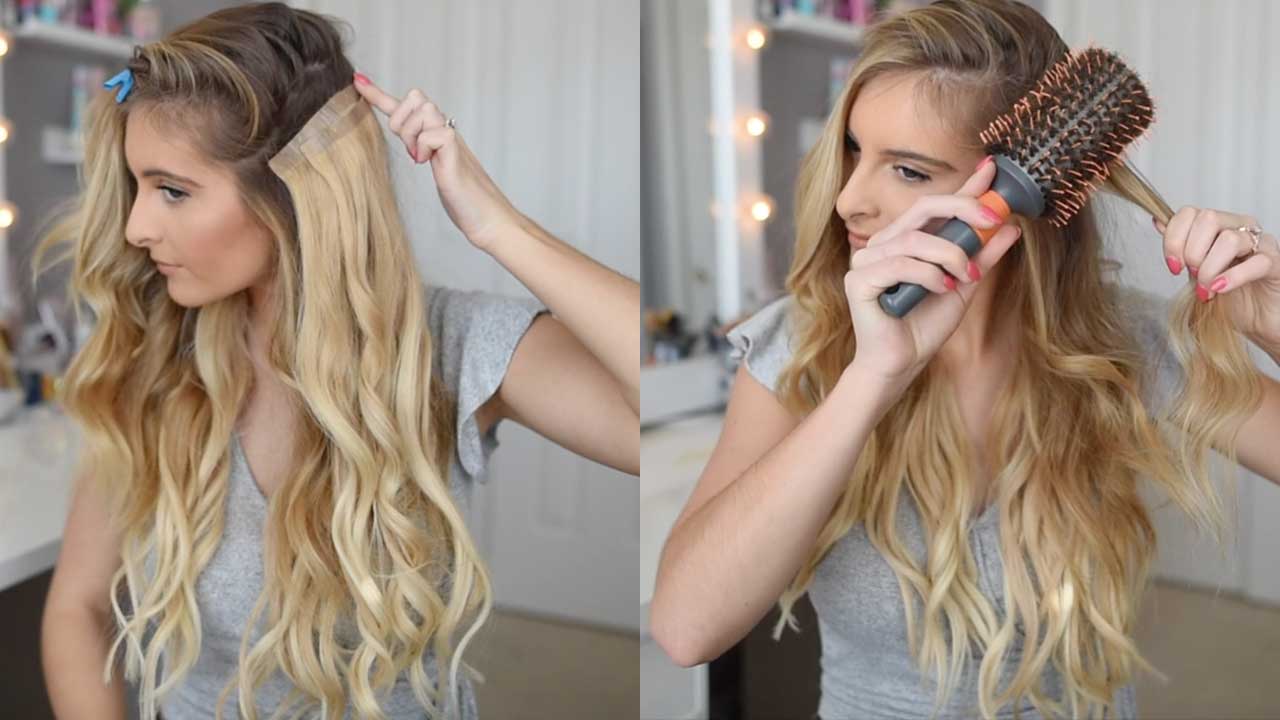
- Blow-Drying: For a natural, blended look, consider blow-drying your extensions along with your natural hair. Use a round brush to smooth out any differences in texture and to add volume where needed.
- Adding Volume: To give your extensions more body, consider using volumizing products like mousse or a root lift spray. Be sure to apply these products evenly to avoid clumping.
Step 5: Proper Placement
The way you place your extensions can make a huge difference in how natural they look.
- Strategic Placement: When applying clip-in extensions, place them in sections where they’ll be covered by your natural hair. Start from the nape of your neck and work your way up, leaving enough natural hair on top to cover the clips.
- Blending at the Roots: If your natural hair is much shorter than the extensions, consider backcombing the roots slightly before clipping in the extensions. This will help the extensions blend better with your natural hair.
- Avoiding Gaps: Ensure that the extensions are evenly distributed around your head to avoid any visible gaps. This is especially important if you’re using multiple pieces or wefts.
Step 6: Maintenance and Care
Customized hair extensions require proper care to maintain their look and longevity.
- Washing: Wash your extensions as needed, but not too frequently. Use a sulfate-free shampoo and conditioner to keep the hair soft and manageable. Always detangle the extensions before washing them to prevent knots.
- Brushing: Use a wide-tooth comb or a brush designed for extensions to detangle them gently. Start from the ends and work your way up to avoid breakage.
- Storing: When you’re not wearing your extensions, store them in a cool, dry place. Consider using a storage bag or box designed for hair extensions to keep them protected from dust and damage.
- Avoiding Heat Damage: Minimize the use of heat styling tools to prolong the life of your extensions. When you do use heat, always apply a heat protectant and use the lowest heat setting possible.
Conclusion
Customizing hair extensions is the key to making them look and feel like they’re a natural part of your hair. By carefully selecting the right extensions, matching the color, cutting and styling them to suit your needs, and placing them correctly, you can achieve a seamless blend that enhances your overall look. With proper care and maintenance, your customized hair extensions will not only look amazing but will also last longer, giving you more value for your investment. So, go ahead and make those extensions truly yours—your dream hairstyle is just a few steps away!
Stay in touch to get more news & updates on Gossips.Blog!